La soldadura SMD se refiere al proceso de soldar componentes electrónicos de montaje superficial a placas de circuito impreso.. A medida que los dispositivos electrónicos y los PCB se han vuelto cada vez más pequeños, el uso de componentes SMD se ha disparado en el diseño de circuitos. El pequeño tamaño de los componentes SMD permite una densidad de componentes mucho mayor en las placas de circuito y permite la miniaturización de la electrónica moderna.. sin embargo, Su pequeño tamaño también crea algunos desafíos únicos para el ensamblaje y la soldadura.. En esta guía, repasaremos las herramientas clave & materiales, the step-by-step process for properly soldering SMD components and master SMD soldering rework.
Básico Herramientas de soldadura SMD & Materiales
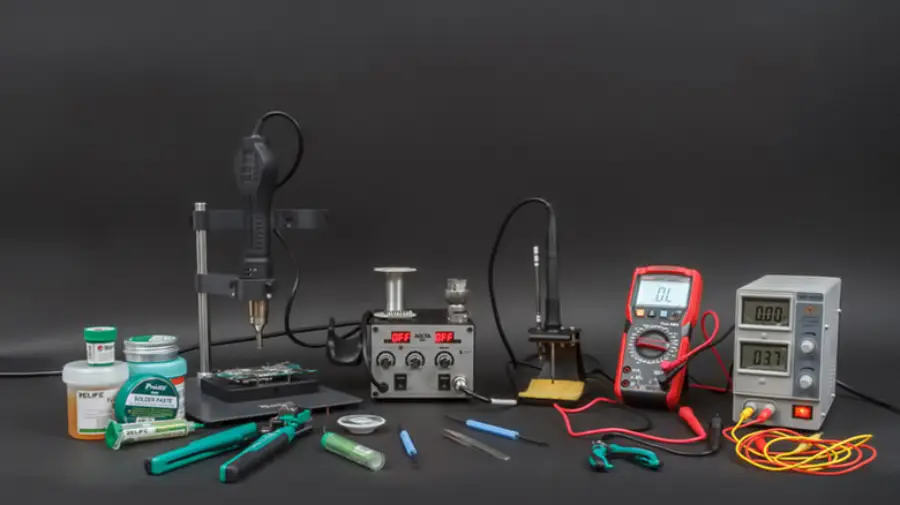
La soldadura de dispositivos de montaje en superficie requiere algunas herramientas especializadas para manejar componentes pequeños y realizar uniones de soldadura de precisión.. Éstos son algunos de los artículos esenciales que necesitará:
Soldador: un soldador de punta fina en el rango de potencia de 15 a 30 W es ideal para trabajos SMD. Se pueden utilizar puntas tan pequeñas como 0,5 mm.. Las funciones de control de temperatura ayudan a evitar el sobrecalentamiento.
Hot Air Soldering Gun – Use hot air to melt solder or solder paste, equipped with different gun tips.
Flujo – Usually rosin solution or flux paste. Pen-type or needle-type applicators allow for better control of the amount used.
Cleaning Agent – PCB cleaner or isopropyl alcohol, usually combined with a brush or cotton swabs, is used to remove residual flux.
Solder Paste– Solder paste consists of a mixture of powdered solder alloy and flux cream. Permite aplicar soldadura con precisión a las almohadillas SMD antes de colocar los componentes..
Microscopio: un microscopio estereoscópico o lupas son indispensables para inspeccionar pequeñas uniones de soldadura y la ubicación de componentes.. Lo típico es un microscopio con un aumento de 20x a 40x..
Pinzas: las pinzas de punta fina permiten un manejo y colocación precisos de componentes SMD tan pequeños como 0201 o 01005 tamaños (0.25mm x 0,125 mm). Se prefieren las pinzas antiestáticas..
Soldering Helping Hands: las herramientas de ayuda con lentes de aumento permiten la colocación de PCB con manos libres bajo un microscopio durante la soldadura..
Stencil – plantillas de PCB Son láminas de metal delgadas cortadas con láser con un patrón de aberturas que coinciden con el diseño de la almohadilla de soldadura de la PCB.. Para aplicar pasta de soldadura, la plantilla se alinea con la PCB y la pasta se filtra sobre las almohadillas a través de las aberturas de la plantilla. El uso de una plantilla permite una aplicación precisa y eficiente de soldadura en pasta antes de la colocación del componente SMD..
Plantillas: las plantillas ayudan a colocar las placas en un ángulo que mejora la visibilidad y el acceso a las uniones de soldadura debajo de los componentes durante la soldadura manual..
Herramientas de succión/desoldadura de soldadura: se utilizan herramientas de vacío especializadas para eliminar o reelaborar juntas de soldadura y desoldar componentes para trabajos de reparación..
How to Do SMD Soldering: A Professional Step-by-step Guide
Prepare la PCB limpiándola a fondo para eliminar cualquier residuo u oxidación que pueda estar presente.. You can then start SMD soldering with a soldering iron or a hot air soldering gun.
Soldadura SMD with Soldering Iron
Paso 1: Aplicación de fundente
Use a flux pen to evenly cover all SMD pads with flux. For leadless ceramic ICs, pre-tin pads with solder (work quickly at a moderate temperature to avoid over-melting).
Paso 2: Colocación de componentes
Use anti-static tweezers to precisely place the chip on the tarjeta de circuito impreso almohadillas. Check thoroughly to ensure that each terminal is aligned with its respective pad.
Paso 3: Corner Tack Soldering
Put a little solder on the soldering iron tip to solder the diagonal corners of the chip and hold it in place. Recheck alignment before the next step.
Paso 4: Flux Reapplication
Use the flux pen again to apply a fresh layer of flux over the pins and pads, ensuring smooth solder flow and preventing oxidation.
Paso 5: Drag Soldering with a Mini WCra Tip
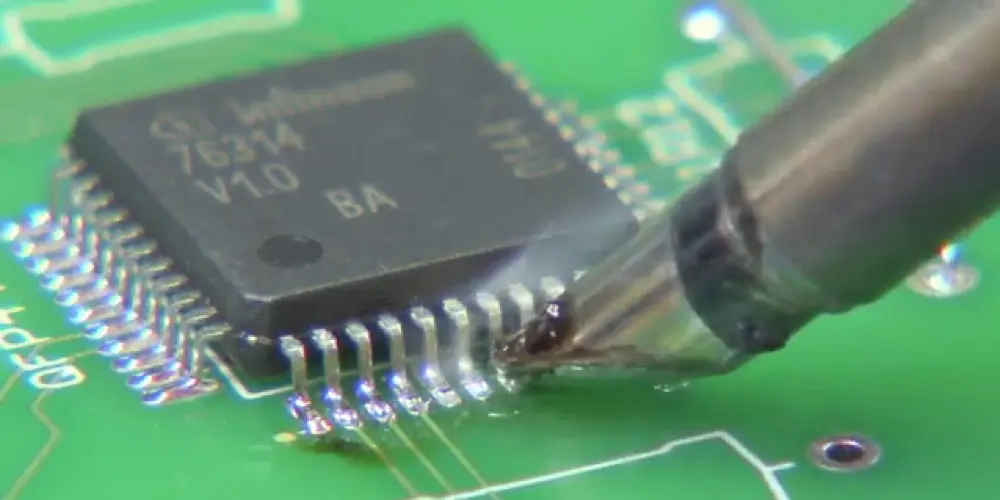
Use a mini wave tip to drag soldering, which has a solder reservoir at its head. Firstly load the reservoir with molten solder. Gently touch the outer ends of the pins and QFP pads with the tip. Slightly lift the tip by about 0.5 mm to allow molten solder to flow from the reservoir into the pad and pin area, forming a solder joint. En este paso, pay attention to the hand gestures. The axis of the soldering iron tip should form an angle of 30°to 45°with the edge to be soldered. Do not drag soldering too fast, and control it to drag through one soldering point in about 1 segundo.
Paso 6: Inspección final & Limpieza
Once soldering, thoroughly inspect each solder joint under a microscope to check for any shorts or poor soldering that require rework. For short circuits, apply flux and re-drag (max 2 attempts per area). If the soldering is not done properly once, wait until it cools down before soldering again. (≤3 reworks total). While there are no defects, perform a clean process.
Soldadura SMD con Hot UNAir Soldering GRAMOun
Paso 1: Pre-Soldering Inspection
Inspect the PCB pads for adequate solder bumps. If the solder amount is insufficient, apply a small amount of solder on the pads with a soldering iron. If there is no solder bump, deposit solder paste on the pads using the PCB stencil.
Paso 2: Aplicación de fundente
Apply flux to both the component pins and the pads to improve adequate wetting during the reflow process.
Paso 3: Colocación de componentes
Use tweezers to position the SMD component accurately on the PCB pads. Make sure the leads are properly aligned with the pads.
Paso 4: Precalentamiento
Before soldering, use the hot air gun to gently preheat the area around the component. This prevents thermal shock and ensures even heating.
Paso 5: Reflujo Proceso de soldadura
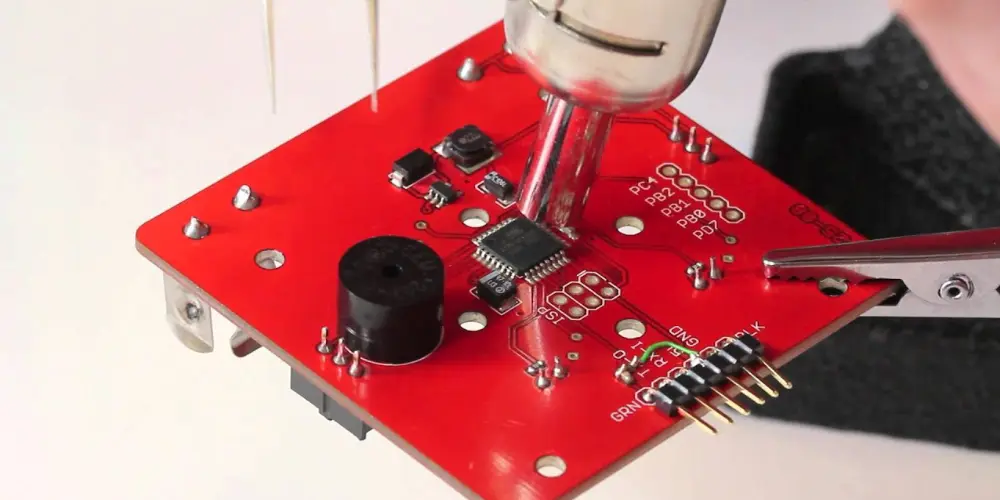
Apply hot air to the component evenly till the solder melts and reflows. For small SMD components, surface tension will help the component auto-align into the correct position. When working with QFP components, pay attention to pin alignment during heating. It’s recommended to solder one row of pins first, verify for alignment, and then solder the other rows.
Paso 6: Inspección final & Limpieza
Una vez completada la soldadura, inspect for any potential defects. Clean the circuit board with isopropyl alcohol and a brush or cotton swabs to eliminate any residual flux.
Consejos a seguir durante el proceso de soldadura
- Utilice la temperatura efectiva más baja del soldador para evitar dañar componentes sensibles..
- Mantenga limpia la punta de soldadura entre uniones para garantizar una transferencia de calor óptima a la unión..
- Apply just enough solder to form a proper fillet on each joint. Insufficient or excess solder can lead to unreliable connections.
- Observe el flujo de soldadura y la humectación y vuelva a aplicar fundente o almohadillas de pre-estaño si es necesario.
- Evite tocar o golpear la PCB hasta que todas las uniones de soldadura se hayan enfriado y endurecido..
- Visually inspect underneath components like BGAs and QFNs if possible.
- Llevar ESD prevention steps like grounding wrist straps and mats.
- Trabajar sistemáticamente desde el centro hacia afuera o desde componentes pequeños hacia otros más grandes..
- Mantenga las almohadillas frescas evitando el calor prolongado en un lugar para evitar que se levanten o dañen la PCB.
How to Do SMD Soldering Rework?
Reelaborar la soldadura de dispositivos de montaje en superficie es un proceso delicado pero una habilidad esencial para Reparación de PCB y modificación. Si bien se debe tener mucho cuidado, Es posible desoldar y reemplazar con éxito componentes SMD sin causar daños a la placa.. We will then introduce how to do SMD soldering rework using a hot air soldering gun and a soldering iron.
Desoldering with a Soldering yoron
Apply flux on the component pins and select an appropriate soldering iron tip with 200-400℃ temperature. Heat the pins to melt the solder and remove the components with tweezers. The operation is slightly different for various types of components. The following are the specific details.
Two-Terminal SMD Components – Begin by applying solder to one end and heating it using the soldering iron. While the solder is melting, quickly heat the other end. When both ends are molten, use tweezers to remove the component. You can use two soldering irons to heat both ends at the same time.
Paquete doble en línea (INMERSIÓN) circuitos integrados – Apply flux to the pins, then pile solder along one row. Move the soldering iron along the row of pins to melt the solder. Insert tweezers between the IC and pads on the molten side and lift to separate the pins. Remove excess solder with a soldering iron or solder wick. Repeat the operation for the other side to remove the component thoroughly.
Paquete cuádruple plano (QFP) circuitos integrados – Apply flux to the pins and solder wick. Place the solder wick over the row of pins and heat with a soldering iron. Insert a thin non-wettable steel shim between the pins and the pads to lift them. Repeat for all sides until the chip is off.
Desoldering with a Hot Air Gun
Apply flux on the component pins and hold the components with tweezers. Preheat the components around with a hot air gun, then blow on the components. Do not stay in one place and move the hot air gun head quickly to heat each pin. When the pin solder is melted, remove the components with tweezers. Finalmente, clean the pads for re-soldering.
What you should keep in mind:
-Perform the overall pre-heating, usually for 30 segundos.
-Choose the gun tip according to the shape of the component, using a tubular gun tip in general.
-Keep the gun tip perpendicular to the circuit board as much as possible and about 10 mm away from it.
-Generalmente, set the wind speed to 1-3 levels and heat to 5 levels.
Pensamientos finales
La soldadura SMD puede parecer desalentadora al principio debido a que se trabaja con componentes y uniones ridículamente pequeños.. Pero con algo de práctica, las herramientas adecuadas, y siguiendo una técnica sólida, Puedes soldar con éxito componentes de casi cualquier tamaño.. Los componentes de montaje en superficie son cada vez más pequeños y las placas están más densamente empaquetadas, Aprender habilidades de soldadura SMD se está convirtiendo en una necesidad para cualquier principiante de PCB y aficionado a la electrónica..