No one wants cold solder joints on PCB, but it does occur in the PCB assembly process if you are not careful or skillful. In this text, we will let you know deeply about solder cold joint, show you how to avoid it, and share the fix steps with you who are unluckily in a dilemma of cold joint solder.
What is a cold solder joint?
A cold solder joint is a defect, which results from low soldering temperature, short soldering time, and half-melting soldering during PCB soldering. For example, the temperature of filler metal between base metal is under the lowest requirement of wetting temperature. Sometimes, wetting happens in part of a whole, leading to incomplete metallurgical reaction.
What Are the Symptoms of A Solder Cold Joint?
Generally speaking, its surface looks like mandarin orange’s. And joint distances of them are in order. However, they are so fragile since they have a poor IMC layer. Also, the collapse height is not satisfying. If you found the above symptoms on your µBGA PCB, it properly suffers cold soldering.
How to Identify Cold Solder Joint?
Many people identify cold solder joints by visual inspection. In addition to seeing the status of the joint surface, you should check the detect surrounding solder joint at the same time, such as uneven solder, uneven coverage of bonding pad, and obvious gap between pad and pins. Mechanical inspection also plays an important role in identifying it. What you need to do is to touch the solder joint by a needle, checking whether it is loose. Electrical test is another professional way to identify it. You should use a multi-meter to check disconnection between joints. In common case, we highly recommend using multiple method to identify cold solder joint.
Different Types of Cold Solder Joints

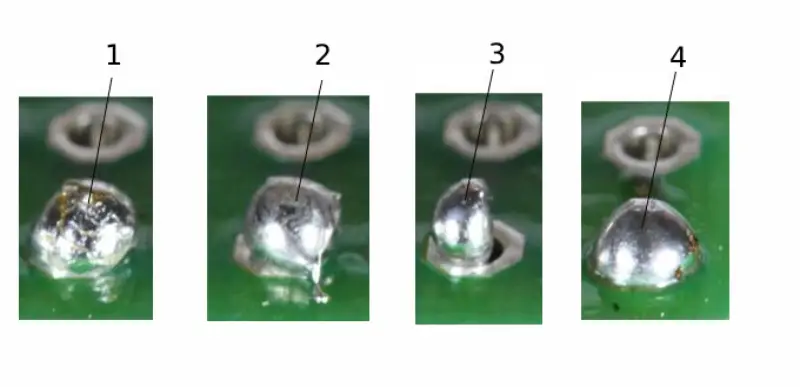
- Common Cold Joint :Referring to the first photo above, we can see the lumpy and rough surface. This is a typical sample of cold joint.
- Cold Joint With Insufficient Wetting for Pad: Sometimes, it comes with insufficient wetting for pad, like the second photo. Although, the solder wet the leads well, it doesn’t formed a good connection to the pad.
- Insufficient Wetting for Pin&Pad: What’s worse, insufficient wetting can occur to the pin and pad at the same time. The third photo clearly show this situation where the solder wet the pin and the pad badly without good connection.
- Too Much Solder: Too much solder, like the fourth photo, may be not a good thing for a joint. It is entirely possible that it wets neither the pin nor the pad without a stable electrical connection.
Cause of Cold Solder Joint
In the process of SMT PCB, improper setting of temperature change for reflow soldering machine lead to a rocket or a plummet temperature. Therefore, tension of soldering paste in the machine is uneven during physical transformation, resulting in solder cold joint. Additionally, factors like solder shaking during cooling and mismatch between the component shape and joints position can lead to sold cold joint.
Does A PCB With Cold Solder Joint Still Work?
No. Cold solder joint will lead to malfunction of PCB. There will be bad contact in the circuit because joint is important connection point between each components. Once its quality fails, components don’t link well together, leading to open circuit. Moreover, if cold solder joint takes charge of the connection to the signal wire or ground, the PCB may suffer signal interference during signal transmission.
Prevention of Cold Solder Joints
Don’t worry. Here are some good tips on preventing it.
- Control time and temperature of soldering. It is advisable to set the peak temperature to the value with 15 centigrade higher than metal melting point. Also, it is good to set this peak last above 45 seconds.
- It is important to eliminate all the shaking factors contributing to uneven solder.
- Try to use high-quality solder paste without any metal contamination.
- If you get used to customize PCB, solder technique and quality assurance system audit counts a lot.
How Do You Fix It?
If cold soldering still happen, don’t worry. We have some useful fix suggestion step. In common, itsfixing is about metal surface maintenance.
Step 1: Clean oil and dust in the surface of joint.
Step 2: Preheat related area by heat gun or fire till the temperature of metal reach proper value for soldering.
Step 3: Heat the filling material, such as cold solder alloy, to the form of liquid. Then, apply it on the solder joint.
Step 4: Fit the filling material into the joint evenly and make sure that it is combine to the original metal completely.
Step 5: Adjust the fixing area and the whole shape of the solder joint.
Step 6: Cooling and cleaning the joint.
After conducting testing towards the circuit, you can be confident of your PCB.


